|
|
Home | Audio | DIY | Guitar | iPods | Music | Brain/Problem Solving | Links| Site Map
This work is licensed under a Creative Commons License.
Convert your LPs into CDs: Connecting Turntable to Directly to PC and Recording
Method I | Method II | Method III
Converting Vinyl to Digital: The Preamp Connection
A lot has happened since this page was first pulled down. The most obvious change is in the technology now available. This page offers some "old school" tips on audio conversion. To get the latest and greatest then you should use the following to get you going...the following pages will walk you through the entire conversion process and introduce you to the technology. To get the best exposure read this page as well as the following:
Below are detailed instructions on converting your LPs to digital.
Converting Vinyl to Digital: Getting Started With the Preamp/USB Connection Some basics that will give you a foundation from which to build.
Converting Vinyl to Digital: Defining Audio Quality in iTunes Convert using the highest quality audio codec.
Converting Vinyl to Digital: Turntables and Cartridges...all you need to know
Converting Vinyl to Digital: Tune-up a Turntable Insure that the highest quality of audio is attained at the first level of the analog process...the turntable.
Converting Vinyl to Digital: All About The Phono Preamp Some recommendations for equipment needed at the phono preamp level.
Connecting a Turntable to a Computer Configurations Diagrams of different configurations.
Connect Turntable to Computer Here is how you actually connect the turntable. More examples coming.Digital Audiophile: Defining Audio Quality in iTunes
Digital Audiophile: Importing a CD Using iTunes
Digital Audiophile: Moving Your iTunes Library Between Computers
Coming...using GarageBand or Audacity to insert tracks or spaces between each song.Introduction
In this tutorial we will show you a step-by-step guide on how to convert your vinyl record collection into CDs, including how to connect your turntable to your PC and how to remove noise from your recordings. You'll need the following:
- One turntable; Tune up your turntable, Connecting a Turntable to a Computer
- One receiver or preamp; Preamps, Converting Vinyl to Digital: The Preamp Connection
- One PC with a sound card installed;
- One stereo RCA + ground cable to connect the turntable to the receiver;
- One cable with one stereo mini jack at one end and two RCA connectors at the other end to connect the receiver to your PC;
- Pair of computer speakers to monitor what is being recorded;
- CD-R recorder and blank media;
- Proper software for audio recording;
- Proper software for noise removal; Digital Audio & Recording, Audacity Tutorial for High School PDF
- Proper software for CD recording. Importing Music Using iTunes, Defining Audio Quality in iTunes,
We will be talking about each one of these components during our tutorial.
First of all, we have to tell you that no matter how well this conversion is made, the quality will never be the same as that of a professional CD. The great villain here is the noise, and we will take some time today explaining this problem. So, if you are a sound freak, it is better to buy the CD version of your favorite records than making this kind of conversion.
Of course there are cases in which the conversion is an advantage. The most obvious one is when the vinyl record you own is rare and has never been released on CD. Another case is the cost. It is much cheaper to convert your entire LP collection into CDs than buying the whole collection again on CD. In this case, the conversion of LPs into CDs is an advantage, mainly if you are not a sound freak concerned about low noise levels.
Another disadvantage of the conversion is that you will have the records recorded on CD-R, without the cover and the booklet. If you are the kind of person who really enjoys having a complete CD, with cover and booklet, so you should buy the CD at the store and not convert its equivalent in vinyl.
But going back to the noise, there are two kinds of noise which are produced during the conversion of a vinyl record into a CD. The first kind of noise is the one produced by the vinyl record itself, such as cracklings caused by small scratches existing on the vinyl record's surface. It is possible to erase this kind of noise by using the computer and we will see in another time how it is made.
The second kind of noise is the one caused by the equipment itself, called white noise. The white noise can come from many places: from the record player, from the amplifier (receiver), from the sound board, from the cables used in the connections, etc. To fully understand what white noise is, do the following experiment at home: play a cassette tape in a stereo. Press the pause button and keep it pressed. Turn the volume of the amplifier up. You will clearly listen to some noise which is not being produced by the cassette tape, but by the tape-deck itself. This is the white noise. Obviously when we convert our vinyl record into a CD we will not want the presence of this kind of noise.
The amount of noise that an audio equipment produces is called SNR (Signal-to-Noise Ratio), that is measured in a unit called decibel. The larger this ratio, the better. A CD player, for example, has a larger signal-to-noise ratio than a tape-deck. If you make the same experiment we have described above with a CD player instead of with a tape-deck, you will notice that the amount of noise will be lower - even inaudible, if you have a really good sound system.
So, one of the main factors for your conversion of LPs into CDs to be the closest possible to perfection is the absence of noise. The choice of a sound board with low noise level (a high signal-to-noise ratio) is the starting point for the insistence of white noise.
Choosing the Sound Card
As we mentioned, the biggest villain of the vinyl-to-CD process is noise. So we want to explain you how to correctly choose the components involved in the process in order to get the lowest noise level possible. We'll start talking about the sound card, which you may already have in your PC, specially nowadays that almost all computers come with sound card embedded on the motherboard.
Just having a sound card isn't enough. You'll need to know how much noise it produces and maybe you'll need to install a better sound card in your system to get better results.
For you to have a better idea of this matter, old ISA sound boards usually have a signal-to-noise ratio of 80 dB. The simplest PCI sound cards (including on-board sound cards) usually have a signal-to-noise ratio of 90 dB. SNR from professional sound cards start at 98 dB.
So we recommend you to use a sound card with at least 90 dB. If you have a PCI sound card, it will do. As for on-board audio, it will depend on the chip used, we'll talk more about this below. If you have an old ISA sound card, you will need to replace it. But honestly, it is better if you could get a sound card with a SNR of at least 95 dB for better results. Sound Blaster Live!, for instance, has a SNR of 96 dB.
But where you can get this information? On the sound card specs page. It can be at its manual, at its manufacturer web site or better still at the sound chip manufacturer web site. If your sound card in embedded on your motherboard then you will find an extensive table with the signal-to-noise ratio of the most common chips used on on-board audio solutions.
Choosing the Turntable
Turntable, record player or pick up are synonyms and is where you play your vinyl records.
Now that you know which sound board to choose, you must also know how to choose a good record player to play your records and for you to be able to record them. If you have any friend who is a DJ and that could lend you a professional record player (such as the famous Technics SL1200 MKII) it would be simply great.
However, the thing that really matters to measure the quality of a record player is not its brand and its model, but the brand and the model of the cartridge and the stylus used. The keyword here is the frequency response. Simpler Styluses used by the cheapest record players have a typical frequency response from 20 Hz to 15 KHz. The problem is that the higher sounds (above 15 KHz) will not be reproduced and, therefore, will not be recorded in the Wav file that you will create in your computer to, later, transform it in a CD. The ideal thing is that you use a cartridge/stylus that allows to obtain a frequency response from 20 Hz to 20 KHz, that is the frequency response the human ear is capable of hearing. But if you use a cartridge/stylus with response from 20 Hz to 18 KHz you will get a very good result (but not the "perfect" one).
Notice that the cartridge can perhaps have a different frequency response from the stylus. The lowest value is the one that counts. For example, a stylus with response up to 15 KHz installed in a cartridge with a frequency response from 20 Hz to 20 KHz: obviously the frequency response of the whole set will be from 20 Hz to 15 KHz.
It is relatively easy to know the frequency response of a cartridge or stylus. First, you need to know the brand and the model of your record player's cartridge and stylus. This is easy, because most of the times it is written there. Next, check this characteristic in the manual of the cartridge and stylus. You can also find this information on the Internet, at the manufacturer's site. For example, at the Stanton site (http://www.stantonmagnetics.com), one of the most well-known cartridge and stylus manufacturer, we found that the frequency response of the cartridge/stylus 680 EL II is from 20 Hz to 18 KHz, for example.
Another trick to find the frequency response of a stylus is looking for the same stylus at specialized stores. This information is specified on the stylus's box, together with a graphic.
If your record player uses a cartridge of the kind that comes attached to the record player's arm itself, so those specifications are in the record player's manual.
By the way, the ideal is that you used a new stylus to convert your LPs into CDs, to avoid sound imperfections (muffled sound, for example) due to an old stylus.
Connecting The Turntable
Now that you already know how to identify a good sound card and a good record player for your conversion to be perfect, now we will explain how to connect your turntable to your PC. For this step you will need:
- One turntable;
- One receiver;
- One PC with a sound card installed;
- One stereo RCA + ground cable to connect the turntable to the receiver;
- One cable with one stereo mini jack at one end and two RCA connectors at the other end to connect the receiver to your PC;
- A pair of computer speakers to monitor what is being recorded.
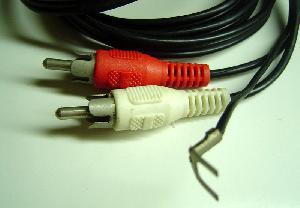
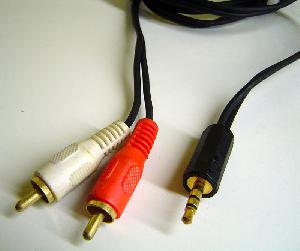
First let's take a look on the cable that connects the turntable to the receiver. This cable is shown on Figure 1. It has three plugs on each end, one red (or yellow) RCA standard, one white (or black) RCA standard and one ground wire with an "Y" shaped terminal.
Figure 1: Cable used to connect your turntable to your receiver.
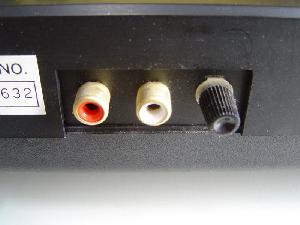
Locate on the rear of your turntable were the plugs are connected. You will find two female RCA connectors and one thumb screw to connect the ground wire, see Figure 2.
Figure 2: Turntable plugs.
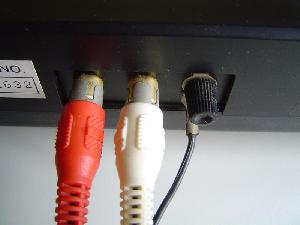
Just connect the male red (or yellow) plug from the cable into the red (or yellow or labeled "R" or "Right") female turntable plug, the male white (or black) plug from the cable into the white (or black or labeled "L" or "Left") female turntable plug and screw the "Y" shaped terminal from the ground wire to the thumb screw. The correct grounding is very important, because if this wire isn't connected or has a bad connection you will get noise ("hum" noise). This color scheme for cable connection will be the same from here on.
Figure 3: Turntable with its cable correctly installed.
The other end of the cable you will need to connect to the receiver. You cannot connect your turntable directly to your PC, you must use a receiver. There are two issues involved. First, the impedance from the turntable output and the sound card input are different, which means that the sound level will be very low. Secondly, the output of the turntable is not RIAA equalized. We will explain what this is shortly.
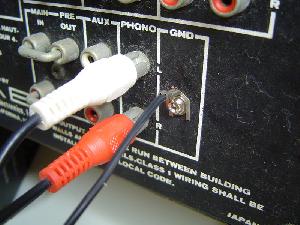
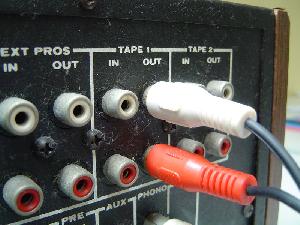
Looking at the back of your receiver you will find a lot of plugs. The turntable must be connected to the plugs labeled "Phono" and your sound card must be connected to the plugs labeled "Tape Out" or "Record Out". Check this out on Figure 4.
Figure 4: Plugs located on the receiver rear.
Just connect the other end of the turntable cable to the Phono inputs. The red (or yellow) male RCA connector from the cable must be connected to the red (or yellow or labeled "R" or labeled "Right") female RCA Phono plug from the receiver and the white (or black) male RCA connector from the cable must be connected to the white (or black or labeled "L" or labeled "Left") female RCA Phono plug from the receiver. The ground wire should be screwed to the thumb screw labeled "Ground" or "GND" on the receiver. Once again, this connection is really important. If you don't connect the ground wire or if its screw is not tight enough you you will get "hum" noise.
On Figure 5 you can check the cable installation.
Figure 5: Turntable connected to the receiver.
Connecting The Receiver
Now you need to connect the receiver to your PC. You will need a cable that at one end is a stereo mini jack plug (also called P2, is the same plug used by walkmans, discmans and MP3 players to connect the headset) and at the other end are two RCA plugs. If you have trouble finding this cable, just look for "a cable to connect my discman to my home stereo" on the stores. Check it out on Figure 6.
Figure 6: Cable used to connect your receiver to your PC.
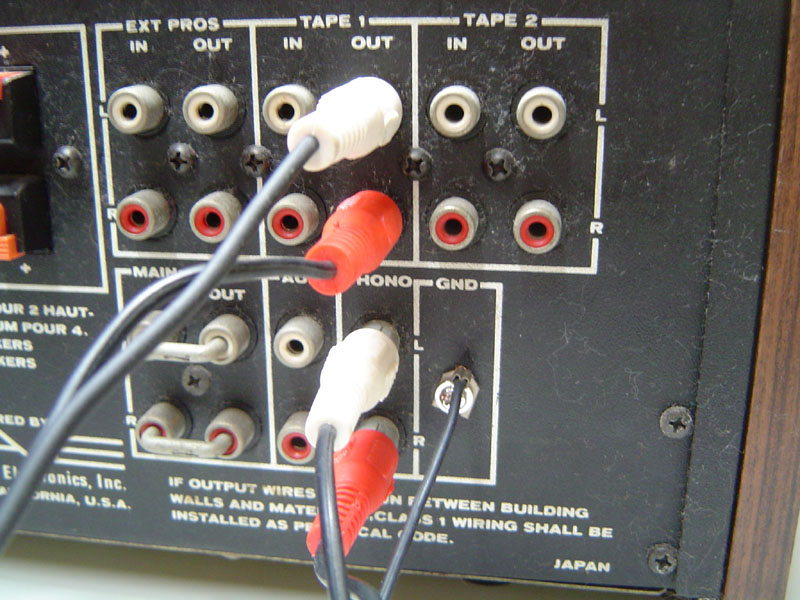
The RCA plugs will be installed on the output labeled "Tape Out" of your receiver, while the mini jack plug will be installed on the input labeled "Line In" of your PC. Just connect the red (or yellow) male RCA plug from the cable to the red (or yellow or labeled "R" or labeled "Right") plug on the receiver and the white (or black) male RCA plug from the cable to the white (or black or labeled "L" or labeled "Left") plug on the receiver. Pay attention to connect the cable to the right place - "Tape Out". You will need a receiver with this output available.
Figure 7: Cable connected to the receiver.
On Figure 8 you check the final aspect of the receiver cable installation.
Figure 8: Final aspect of the receiver cable installation.
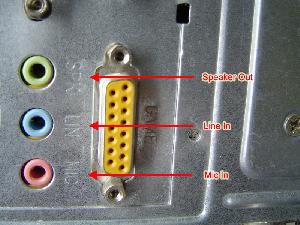
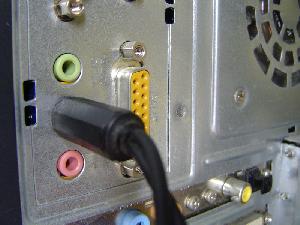
Now you need to install the other end of the cable - the mini-jack plug - to the "Line In" input of your sound card. This input usually uses a blue jack. Look at your computer's rear and locate it with the aid of Figure 9.
Figure 9: Sound card plugs.
Just connect the plug on the Line In input (blue jack), as you can see on Figure 10.
Figure 10: Cable installed.
Since you will need a pair of speakers to monitor what is being recorded, the final sound card cable installation will look like what we show on Figure 11. The speakers must be connected to the "Speaker Out" output, which uses a green jack.
Figure 11: Final aspect of the cable installation on the sound card.
RIAA Equalization
Now that you have already connected your turntable to your PC, it's time for us to explain some more technical details of the conversion procedure.
In the recording process of vinyl records the sound is equalized according to a curve called RIAA (Record Industry Association of America) or CCIR (ComitéConsultatif International des Radio communications, which was the European institution equivalent to the RIAA; nowadays the CCIR is called ITU, International Telecommunications Union). This equalization attenuates the sounds below 500 Hz and increases the ones above 2.120 Hz. In other words, in the recording process of vinyl records the low sounds are cut and the high sounds are increased. This process started to be used in order to standardize and make easier the LP recording on a large scale, allowing all manufacturers to use the same equalization pattern for the recording of vinyl records.
When a record player is connected to the Phono input of a receiver, the existing pre-amplifier circuit makes the reverse of the RIAA curve: it amplifies the low sounds and attenuates the high sounds, in order to cancel the "wrong" equalization made when the record was recorded, in order to achieve a perfect sound reproduction, that is, with the lows and highs at their correct levels and not exaggeratedly attenuated or amplified.
You will find a big problem converting records made before 1955. It was in that year that the RIAA process started to be adopted by the recording industry. Before that year, the RIAA curve was not used. This means that when you play LPs recorded before 1955, the low sounds will be amplified and the high sounds will be cut by the receiver pre-amplifier circuit. As the sound has not been recorded with attenuated lows nor amplified highs, the sound will not be equalized. The solution is to apply, in the program used to record the sounds, an inverse RIAA equalization, canceling the equalization made by the pre-amplifier circuit, making the lows and highs to be set at their correct equalization levels. This can be done by means of the program DC Art (http://www.diamondcut.com), by using the function "Reverse RIAA" in its parametric equalizer.
Recording the LP
The time for us to record our vinyl records in the computer's hard disk has finally come. The procedure is the following:
- Record the LP in AIFF (Mac OS) Wav (Win OS) format;
- Edit the generated file to normalize it's volume level;
- Edit the generated file in a way to eliminate the noise inherent to vinyl records;
- Record the Wav files on a CD, in the CD-DA format (audio CD), allowing the CD to be played by any CD player.
For the recording, you will need to use a recording program for Wav files. There are many programs in the market and you will even use the program that comes with your soundboard. In case you do not have this kind of program, you can search http://www.shareware.com for "wav editor" and you will find many programs of this kind. We particularly recommend the Cool Edit (http://www.syntrillium.com) and the Sound Forge (http://www.sonicfoundry.com), which are the most used ones by professionals of the area.
After having installed the Wav recording program in your computer, the rest of the procedure is relatively simple.
The first step you should take is configuring the computer's mixer. The mixer is accessed by double-clicking on the speaker icon that exists on the task bar (lower right corner). There are two configuration screens that you will need to work at. First, the configuration of the reproduction controls. To do this, select the option Properties from the menu Options. In the screen that will appear, select "Reproduction" in the field "Adjust volume to" and mark all the existing boxes in the field Display the following volume controls". This will display all the volume controls existing in your soundboard. The mixer will be displayed will all the volume level adjusts for reproduction. You should select the box "Without audio" for all the inputs that will not be used: Microphone, Auxiliary, Modem, Video, Synthesizer, CD, etc. The inputs Volume Control, Line and Wave are the only ones that should keep unmarked, for you to be able to hear your work during the recording and editing process.
Next, configure which input will be used to record the Wav file. For doing so, select the option Properties from the menu Options of the mixer. On the screen that will appear, select "Recording" in the field "Adjust volume to". Then it will appear a mixer equal to the previous one, but this time you are adjusting which input will be used to record. Select Line (marking the existing box "Select"). The volume control Line controls the volume level of the record player. We recommend that it keeps adjusted in the middle.
After having configured the mixer, you just have to choose the option Rec (Record Sound or similar) in the recording program, click the icon that indicates the beginning of recording and put side A of the LP to play. But before doing that you should verify the recording level for the sound not to be too low or too loud (what leads to sound distortion). This verification varies according to each program. In Sound Forge, this happens automatically: you click to record and a window containing vertical recording level indicator bars appears. Just put the record to play about in the middle of it and adjust the Line volume control (in the recording configuration of the mixer, that control we have recommended to be in the middle of its course). The ideal is to adjust this control in a way that the audio stays in the average, hitting the level of -3 dB of the graphic, with maximum peaks of 0 dB. Obviously, this adjustment is not that simple.
But, lucky us, most Wav editing programs have a function called Normalize, which analyzes the recorded audio and adjusts the volume of the file properly. That is, with the adjustment that we recommend (mixer control positioned in the middle), the sound will be recorded at a volume below the recommended, and after we will, by means of the editing program, correct the volume of the file. Our recommendation is that you always record at a lower level (and never higher) and after correct the volume with the function Normalize of the editing program.
After having correctly adjusted the recording level volume, put the A side of the LP to record. When side A is over, click the icon to stop recording (stop). At the end of the recording you should be seeing a kind of wave on the screen. In case this does not happen, go back and review the process, mainly the mixer settings. Next, you should record the B side of the LP. We recommend that this should be done in the same Wav file, at the end. That is, record the B side at the end of the A side, in a way where all the songs are recorded in a same file. To do this, just click on the wave on the screen and push the keys Control and End. Following, set the program to record again.
The ideal is that you always start recording a little before and stop recording a little after the songs on the LP. This will make sure that you do not lose any part of the songs. After that, inside the same Wav editor, we will cut those not wanted parts.
Save your file through the option Save in your editor. That's it, your vinyl record has been totally converted into a Wav file.
The next step is to correct the volume of the file through the function Normalize of the Wav editor. In Sound Forge this function is in the menu Process. This function analyzes the file and takes its peaks and stretches them (if you have recorded the sound at a lower volume, as we recommended), making the maximum peak to be at 0 dB. This will make the volume of the songs stay at the same level of the CDs recorded commercially. Do not forget to save the file after applying this function.
After the audio is set to its correct level of volume, you should apply filters to erase the noise inherent to vinyl records. The noise can be classified basically in two kinds: the background click and crackle. There are many programs in the market to eliminate those kinds of noise, such as the DC Art (http://www.diamondcut.com). If you use the Sound Forge (or another program which accept the Sound Forge filters), you will be able to use a package of filters called Noise Reduction. There is a lot of shareware with this same purpose (enter http://www.shareware.com and search for "noise reduction" to know many programs of this kind), such as the DePopper (http://www.droidinfo.com). The DePopper also has as a facility the option Normalize built in, making all the process of normalizing the sound and eliminating the noise automatically.
As most of the people who deal with computing should already know, the choice of a program is pure personal taste. We will give our examples using the program Sound Forge with the filter pack Noise Reduction installed only because it is comfortable for us, since this program is one of the most famous in the audio editing area. This does not mean at all that there are not programs as good as it in the market.
In the Sound Forge with the Noise Reduction installed, choose the option Sonic Foundry Noise Reduction from the menu DirectX. In the window that will open, you will be able to click the box Preview to listen to the sound as it will be like after you apply the filter. We should be very careful with the use of filters, because they can, besides eliminating the noise, eliminate part of the song, turning the result into something very bad. So this is the importance of the function Preview, for you to check if the filter will work properly or not. In many cases the sound will be muffled or "metallic". As you will be able to see, this filter allows countless adjustments and sometimes the configured adjustment can be bad. In our tests, the presetting from the factory has removed correctly the noise of dozens of LPs that we have converted into CDs. We suggest you use it. Only change the adjustments if the Wav file you recorded is really with a very high noise level, and do not forget to always use the function Preview to check if your setting is not making the sound worse instead of making it better. When you find the "right point", apply the filter and save your Wav file.
Crackle Removal
The elimination of crackle can be done automatically or manually. The problem of using filters that automatically remove the crackle is that many times the filter, if it is inadequately configured, also removes parts of the song, leaving the sound muffled or "metallic" (with a little echo). If the recorded sound does not have crackle, there is no need to use this filter, and you go straight to the next step, which is separating the recorded songs in a single Wav file into many distinct Wav files.
You can try using the filter "Sonic Foundry Click and Crackle Removal" from the menu DirectX of the Sound Forge. Use the option Preview to check if the filter will work as you wish. Try to alter the preset filter to see if the result improves. In our tests, we have achieved more success by using the preset 2 (putting the "Click removal 2" in the field Preset). You can also try other programs for the crackle automatic removal, such as the DePopper we mentioned on previous page.
If the number of crackles is low, you can simply remove them manually, which usually gives better final quality. The process is simple and consists in selecting the crackle and applying the filter Sonic Foundry Click and Crackle Removal of the Sound Forge just in the selected area. By doing so, only the crackle is really eliminated and you make sure the rest of the song will not be muffled or "metallic", since the filter will be applied only on the crackle.
On Figure 12 (you should click on it to see exactly what we are explaining), we clearly see a big crackle in the right channel. In general, crackles are easily seen as the one in the figure. Just select the area of the crackle with the mouse and apply the filter for it to be gone.
Figure 12: Big crackle.For smaller crackles, just put the Wav file to run and stop the execution in the moment you hear a crackle (do not forget to keep on following the cursor which indicates the part of the song which is being executed for you to be able to visualize a little where the crackle is). After that, mark the area that has just been played and apply a zoom. You will clearly see the crackle. See, in the next figure, an example where we have a small crackle at the beginning of a selected part (above, left channel) and a crackle a little bigger in the right channel, approximately in the middle of the selected part. Just select each crackle and apply the filter for the crackle to be gone.
Figure 13: Two small crackles.The removal of crackles can be a really difficult process, especially if the recorded LP has many crackles and you cannot manage to make any automatic crackle removal filter work properly, that is, if the filter is making the sound lose quality (gets muffled or "metallic").
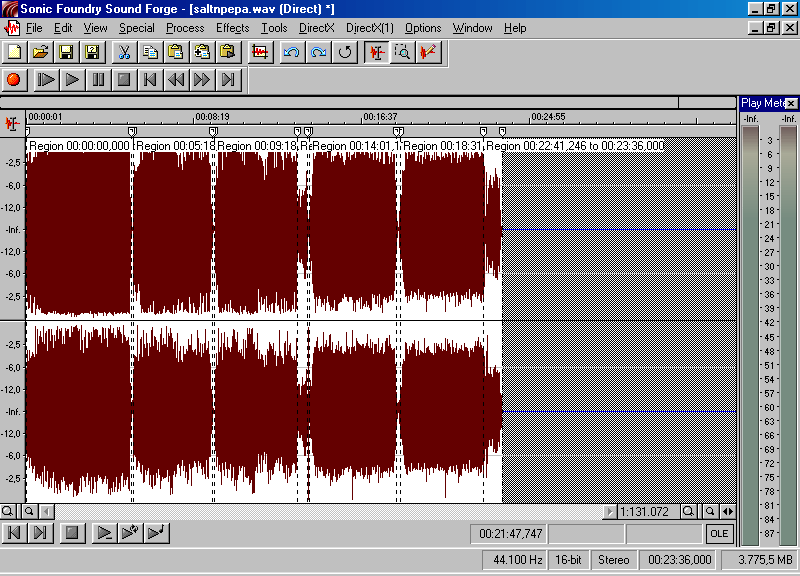
Separating the Tracks
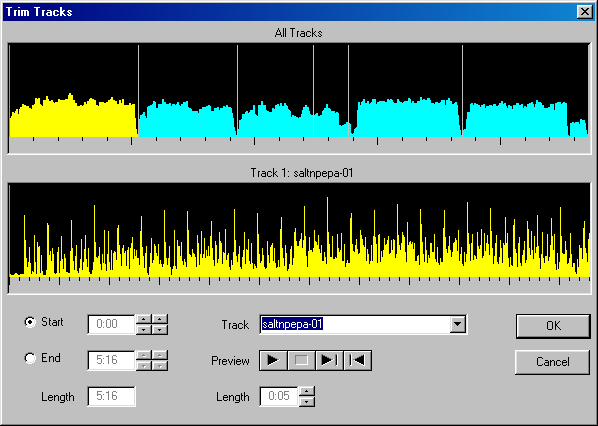
After removing the crackles, your songs will be ready to be recorded on CD. Just do not forget to save your work. Before recording the songs on CD we will have to separate them in many Wav files, one for each song, because, up to now, all the songs are recorded in a single file. This process can be done by means of the Sound Forge itself or by means of a very interesting shareware called LP Ripper (http://www.cfbsoftware.com.au).
The LP Ripper analyzes your Wav file and searches for the blank spaces that usually exist between songs, automatically setting where each track begins and ends. When you use this program, after the analysis, it is good to check if it marked correctly the beginning and end of each track. Use the option Trim Tracks from the menu Edit. With this function, you can make the small adjustment, indicating exactly where each track begins and ends. The LP Ripper just do not manage to analyze very well the records where the tracks are continuous, that is, there is not that well-known blank space between them. In this case, the tip is you entering manually the number of tracks and the time of each one of them (this time is written on the record labels), making the small adjustment next, using the option Trim Tracks.
Figure 14: LP Ripper.If you are going to use the Sound Forge, so you should mark each track as being a region. For doing so, you should select the beginning and the end of each track and mark the region. The beginning of the track should be marked in such a way that you do not have any "blank space" left before the song, while the end of the track should be marked in a way that you neither cut the "fade" effect (that effect which lowers the volume of the music until it gets to zero at the end of each track) nor leave a blank space after the end of the track. That is why the ideal is that you always listen to your work while you keep on marking. With time you will get the necessary practice for this process. The regions are marked through the menu Special option Region List, by selecting Add from the menu that will appear. After marking, check if the beginning and the end have been marked in the right places. Use the zoom tool to check this out and adjust the region (by moving the region marker to the left or to the right) in case you need to make a small adjustment in the marking.
Figure 15: Using the Sound Forge to separate the tracks.After the regions are marked, the Sound Forge itself transforms them into independent Wav files, through the option Extract Regions from the menu Tool.
Recording the CD
With the tracks of your LP recorded in different Wav files, you will be able to record your CD (or convert the files to the MP3 format, if you wish - the Sound Forge itself does that, you just have to open the file and save it using the option Save As altering the kind of file to MP3).
If you use a program such as the Easy CD Creator, just start a new audio CD project (CD-DA) and drag all the Wav files that represent the tracks of your vinyl record to the project, not forgetting to put the files in the same order in which they were recorded in the original record.
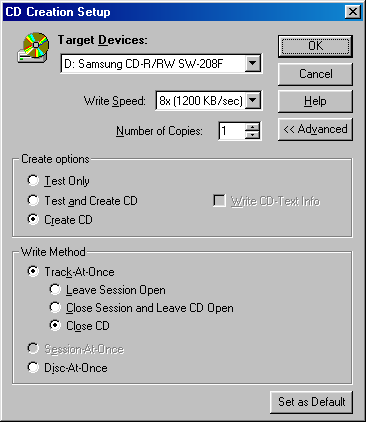
An important tip when recording: you have two options to record audio CDs, Track-at-once and Disc-at-once. The first option should be used in case you want a 2-second blank space between each track. The second option eliminates that space and is specially recommended for records where the songs were originally continuous and you just separated the files to create an index system (that is, to allow you to skip directly to a track of the disk and not create a CD with a single continuous track). Do not forget to ask to close the disk, or your CD will not be able to be read by regular CD players.
Figure 16: Choosing the CD recording method.
LP to CDR Using WinonCD
How to convert your LP to CD
This How-to shows you how to convert your LPs to CDR using WinOnCD
This page uses .png files if your browser doesn't show the pictures check here for an appropriate plug-in
CDR INFO: We aim to show you how to convert an LP to CDR
Connecting Your Stereo
Check your stereo is correctly connected to the input of your sound card. It's vital your stereo and your computer are all using the same ground & this is best achieved by using a multi-socket surge protector through which you connect your computer, speakers, monitor, & stereo components to the same wall outlet. Next connect a non-amplified line out from your stereo - "tape out" or "EQ-out" for example - to your sound card's line-in; using most likely a RCA to 1/8" male plug adaptor-lead.
Recording The LP
Preferred utilities are AIPL Singulator or EAC - as both of these have very good VU meters, which is one thing that WinOnCD is lacking in.
If using Singulator just name your base file track - it will do the rest for you: start your LP & then click: "Record" - adjust the line-in volume of your sound card's mixer so that the loudest song does not go above the second to topmost yellow indicator. . . .
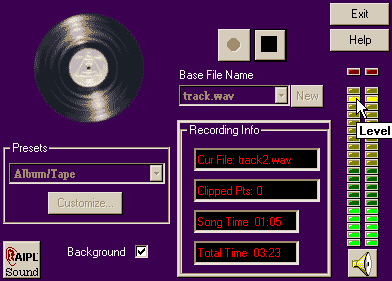
. . . . if the red indicator lights up it means the level's too high. When you've decided on a level, click: "Stop" - then restart your LP and click: "Record" - when given a warning that your tracks will be overwritten, click: "OK"
If using EAC click on: "Tools" & choose to record as .wav
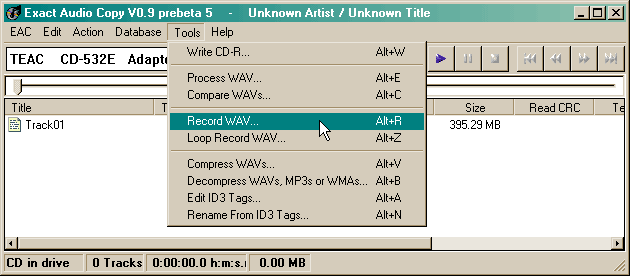
. . . set the VU meter so that it's maximum level is around -12db
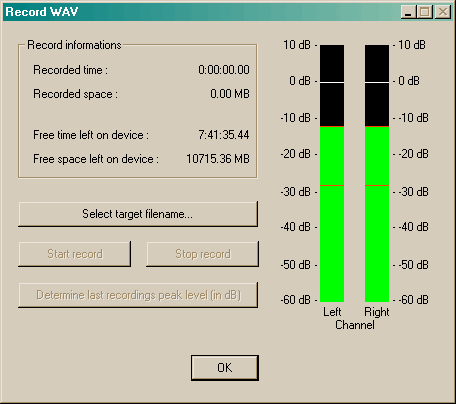
. . . . and simply record Side 1 as .wav1 and Side 2 as .wav2.
If you have a MP3 encoder setup in EAC you could save to MP3 - but unless you're low on hard drive space I suggest you stay with .wav files for quality reasons.
Getting Your Files into WinOnCD
If WinOnCD is not already running, fire it up; & in the New Project window click the Audio tab, then the CD Digital Audio icon; give the project a name or accept the default. If you have WinOnCd running; File/New gets you to the same New Project window.
You should now have two panes: the top one is WinOnCD Explorer, the bottom one's your project window; in this latter the Tracks button should be highlighted & the project window should be showing you the disc number, session number, job number, mode, flags, ISRC and time.
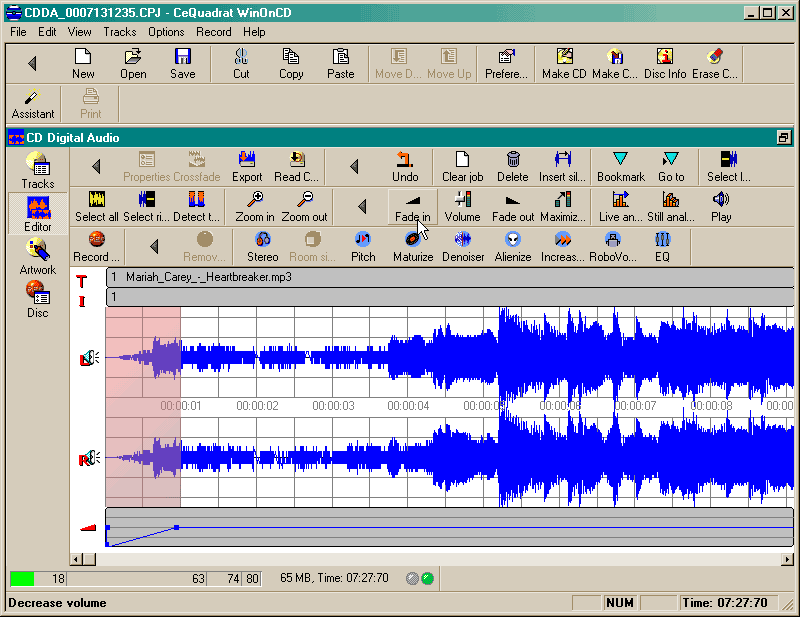
Now click the Editor button; the project window will now contain utilities which can be used to enhance - or play about with - your recording. Those not described below are pretty self explanatory.
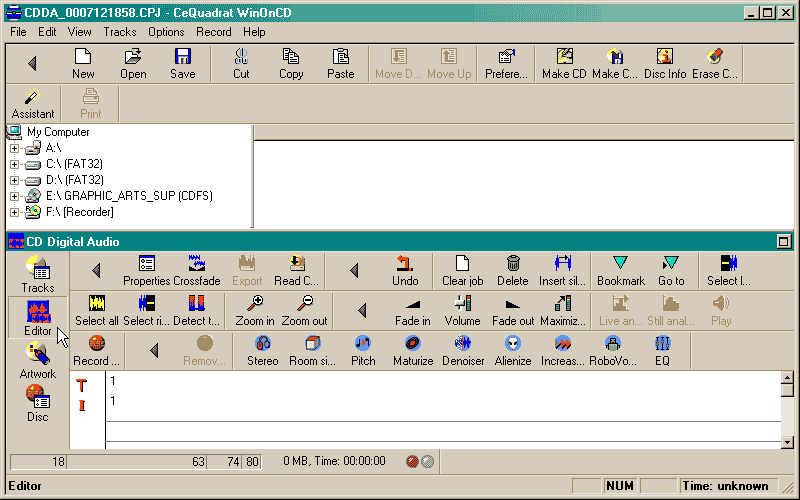
To get the tracks recorded through Singulator or EAC into the editor, you browse to the folder with your .wav or MP3 files in it using the WinonCD Explorer pane . . . now the tricky part: you need to drag and drop your files into the Editor pane one-at-a-time and in reverse order.
If you used EAC you will have only wav1.wav and wav2.wav; so drag wav2.wav into the editor first, then wav1.wav.
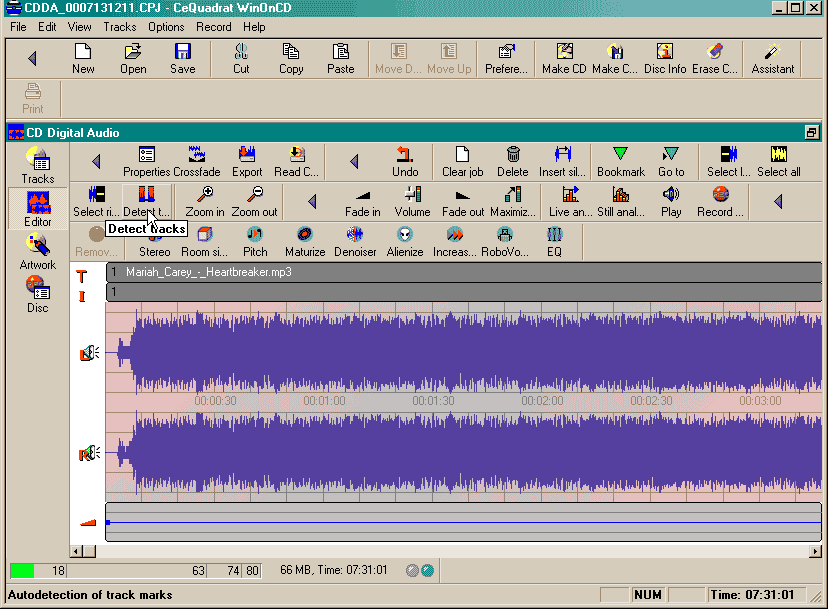
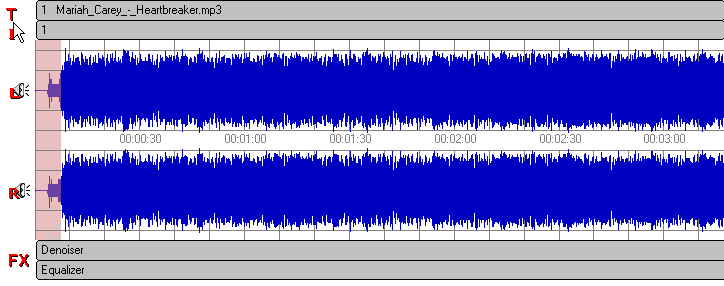
Splitting Tracks
You will now need to split your tracks. Maximize the Editor window as you won't need the Explorer window any more.
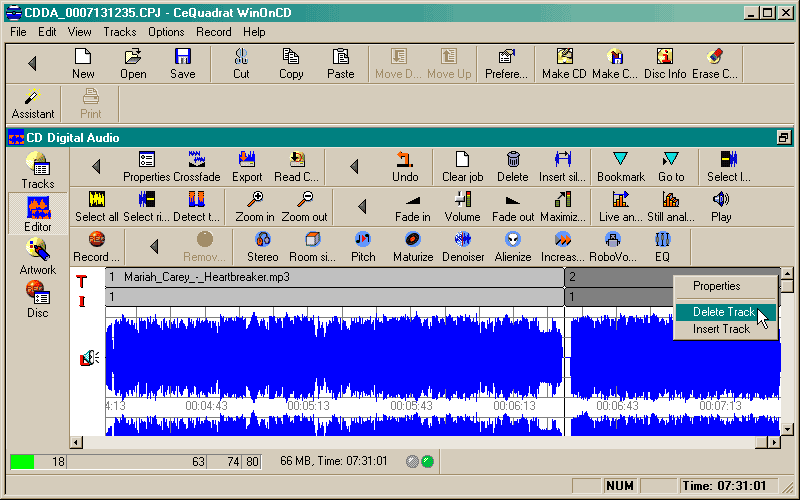
In the Editor window click the Select all button . . . .
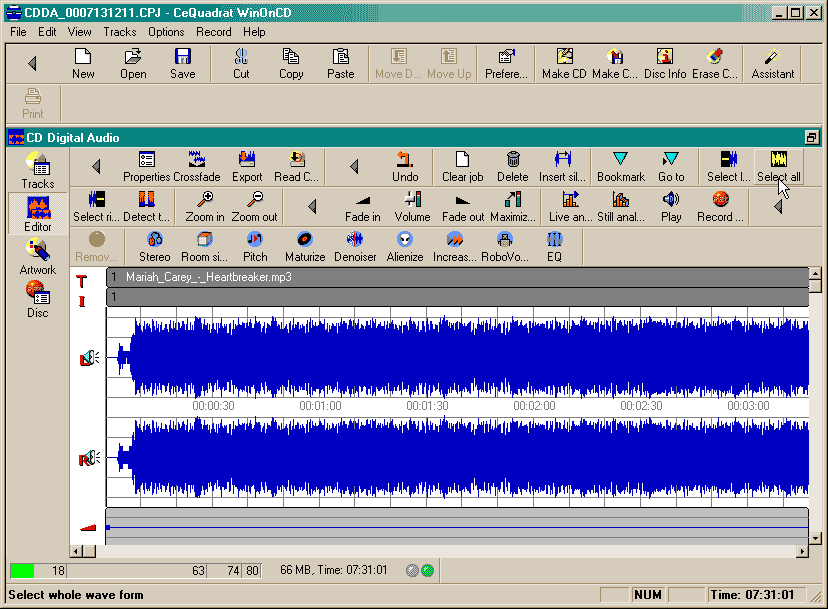
. . . . then the Detect tracks button and let it do it's thing; if it detects a track where it's not supposed to be - usually because of some quiet passage in the track - just click on the track that's wrong, right click & choose Delete track.
Cleaning it Up
Click the Select all button then the Denoiser. Now click Play.
The default settings in Denoiser work well in most cases; if you check the Difference box it will play what is being removed - you don’t want to hear any voice or music there.
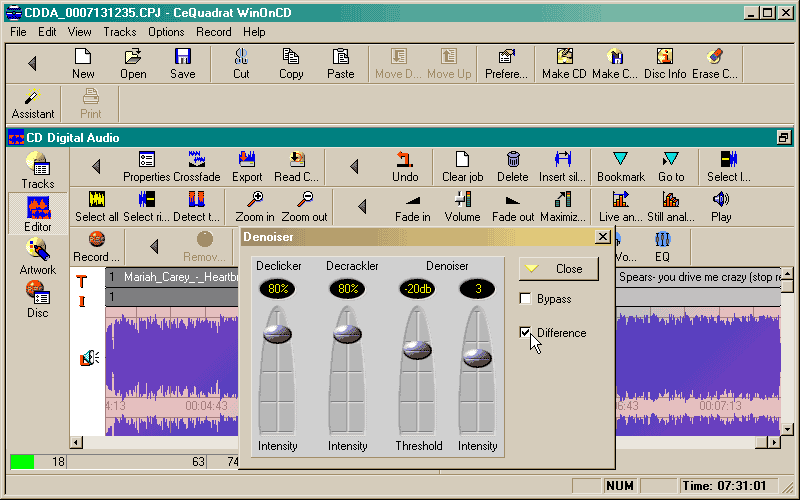
If you hear white noise when you enable Denoiser it means your record level was too high - just click Volume & set both Fade from & Fade to about 5 points lower till it goes away. Once you have Denoiser set how you want it close the Denoiser box [this will just close the box, not stop Denoiser working].
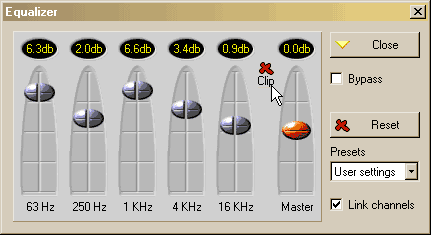
Now click the EQ button and set it to what sounds good to you; if you see a red X saying: "Clip" - lower the master level.
You can burn it as is now; but let's do a little more fine-tuning for a better & more professional sounding CD.
Now would be a good time to save what you've done so far.
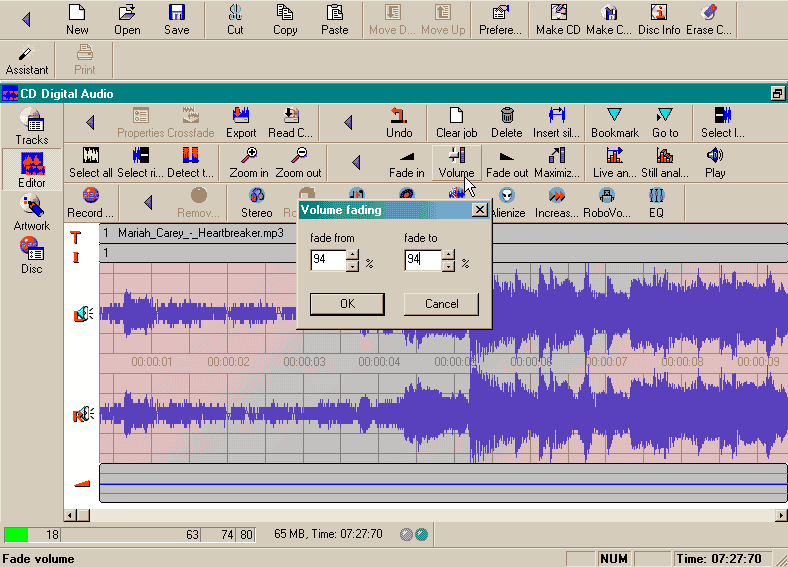
Let's start by normalizing the volume. Click the Select All button again & then Maximize; the Select All button one more time & then Volume; set both Fade-from and Fade-to to 94%
Trimming the run-in from every track is time consuming; but will give you a very nice finished CD.
Start with track 1: place your pointer right after the song starts, left click, & drag to the beginning of the track where it should now be highlighted . . . .
. . . . click the Zoom button: you should be able to see right where your song starts - click the Play button to check.
Now place your pointer close to where the song starts, left click & drag left to highlight the part you want to trim - leaving yourself some room for a fade in - then press Delete.
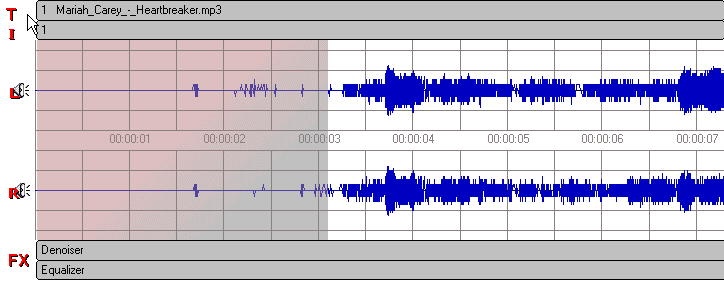
Click: "Zoom out" till you can see all your tracks again & continue trimming the rest of your tracks.
Now repeat the above process; only this time go to about 1 seconds into the song, left click and drag left to highlight it, then click the Fade-in button . . . .
. . .. & continue Fading-in the rest of your tracks.
Burning the CD
Click the Tracks button, right-click on Track 1, & choose Properties.
Start by ticking the global choice: "For all tracks of this job"
In the Title tab you can enter the song title and artist if you wish; in the Parameter tab you should set this to have a 2 second pause before this track.
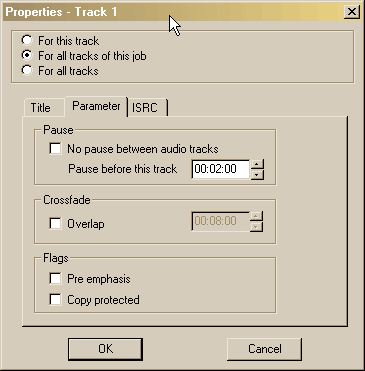
Do not tick: "Overlap" - & the only time you would want to tick: "Pre Emphasis" is for Classical or Celtic music. Leave the ISRC tab blank. Now save your project one last time.
Click the Disc button, tick: "Close CD. Tracks cannot be added later"
Tick: "Disc/Session at once" - uncheck: "On The Fly"
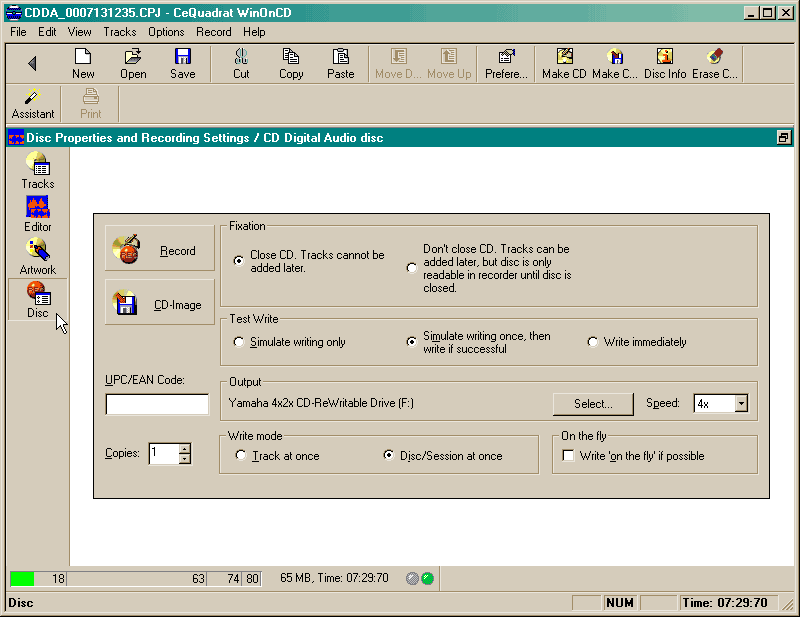
Check the speed-settings for your burner are correct - &, if you have multiple CD-devices, that the right one is selected: stick a blank in & burn.
Notes
The WinonCD editor is non destructive: it does not make any changes to your .wav files, only to the recorded CD.
If making a party CD or concert CD without gaps, I would use a cross fade overlap of 4 secs.
If you are getting a hum from your speakers check your grounds.
How To Copy Convert and Burn a Cassette or LP to CDR Disc
by Raymond Garcia
It's relatively simple to rip (convert) your LP's or cassettes to CD. Here's a list of what you need to copy your old Cassettes, LP, or music CD's to a CDR disc. This is also a good way to rip (convert to mp3) your copyrighted music CD's, some of the newer copyrighted music CD's won't even play on you computers CD-ROM player, so you can't rip them directly to mp3's.
Suggestions: Try to choose a good CDR disc to ensure durability and integrity of the disc. You can try different brands to see which works well with your CD writer and can playback on your CD Player.
Remember to test write to a CD-RW disc before you write to a CD-R disc if possible. Also most new CD players can play CD-R discs but, can't play CD-RW disc. Record your LP, Cassettes, or music CD to your hard drive first, then use a good digital audio software program to clean-up and adjust your music file. Then you can burn the files to CDR.
I get the best results when I record music to my hard drive using the .wav extension to save. The .wav extension will give you the best quality sounding music but, .wav files are very big music files. Then I use a good digital audio software program to clean it up, and to adjust the volume before I convert or save to MP3s, .wav. Copy & Burn a Cassette or LP To CDR Disc Tip PageYou can save your recordings directly to .mp3 it's up to you. WebTechGeek.com
Remember that the limit for a regular CDR is 74-mins of audio or 650M byte of data. And if you use a 80-mins CDR disc, make sure both the CD writer and CD authoring software supports it. There's a lot of software out there, some are specifically for recording or CD authoring while others are an all-in-one solution.
RIP CD Music to MP3 Files Tip
Tip: MusicMatch Jukebox Pro & Windows media player will lit you rip your music CD's to mp3's or convert your favorite mp3's to a standard music CD you can play on most CD players. New FreeRIP can convert your audio CDs to a number of audio file formats. Free File Download.
AD - Evidence Eliminator ~ This program offers complete protection, eliminating tracks you accumulate online. Speed-Up... your PC and Internet Browser, reclaim lost Hard Disk space - All in one click of your mouse! New members automatic discount - Click here Now!
Related: Burning CDRs, All about Mp3s, Mp3 Players, How To safely Store & Fix your CD's
* DVD-Cloner: Backup your DVD movies with any DVD burner.
NEEDED HARDWARE: Copy & Burn a Cassette or LP To CDR Disc Tip Page!
* Stereo Receiver, CD play, Tape Deck, LP Turntable, etc.
* Computer With Sufficient Hard disk space (to store the files) and RAM (to edit and process the files)
* CD Writer Software to Copy The Digital Music File to a CD or DVD Disc. (See Best CDR Burners list here!)
* A Sound card. Most newer computer have a audio out plug on the back of the computer next to the Audio line out plug. In the old computer days you had to install your own sound card.
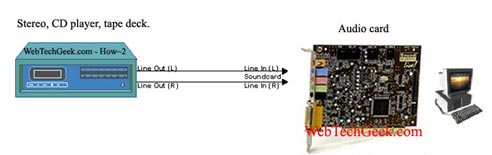
* Interconnect cables (RCA Y Cable) for connection between the cassette deck or stereo and the sound card.
Dubbing Cable: You need a dubbing jack - RCA stereo line jack to mini stereo line jack adopter (mini to twin's 3.5mm jack) price about $2.99. at most local electronics retailers (Radio shack - local or Web site). Make sure to buy STEREO line jack and not Mono!
NEEDED SOFTWARE:Audio Recording Software ( Audio editor / sound recorder ) is a very good digital audio software package - use it to cleanup your music files & adjust volume you can also covert and or save your files as .Wav, Mp3 and more..
Noise Reduction Software or Plug-in (Optional) Audio editor / sound recorder:
CD Authoring Software more here!
Programs to Convert & Burn CDs: click here!
CD to MP3 Ripping Software: click here!
Wav & Mp3 Utilities - here!
Related: All about MP3s here!, What to do with old CDRs here!, How to Safely Store & Repair CDs here!
CONNECTIONS & PROCEDURES:
1. Connect the LINE OUT of the Stereo, LP turntable or Cassette deck to the LINE IN jack of your Computer Audio in (on the back of the PC), most newer PC's come with a on-board audio, look for the line in jack and line out jack on the back of your PC (You will need a RCA stereo line jack to mini stereo line jack adopter).
2. Select the Line In as the proofread recording device (under Windows control panel or Master Volume). In Windows XP double click on the Volume icon in your system tray (right bottom corner)
3. Ensure the LINE IN on the audio mixer of the computer is not muted.
4. Start your audio recording software. ( Audio editor / sound recorder )
5. Depending on your software you use, activate and check all the settings to allow recording from the line in.
6. If possible, you should monitor the incoming signal from the your stereo deck using the audio software to ensure the incoming signal is not too high (in the red) or too low.
7. Start the recording on your computer and start playing on your stereo LP record player or cassette tape deck. Note: You can also record from your stereo radio or satellite music system.
8. Once the material on the cassette or LP has been recorded into the computer, you can save the material as .WAV or .mp3 format and edit the wave files accordingly. You can break them up and save them into the individual tracks; process the files with the noise reduction software; edit out the unwanted parts; etc.
9. When all the recoding and editing have been completed, you should have the same number of audio files that should correspond to the number of songs on your cassette or LP, unless you have omitted some songs. Remember to come back to WebTechGeek.com for more How To's tips!
10. You can close your audio recording software for now, be sure to save all your audio files before you close.
11. Start your CD authoring software, put your blank CD disc in the CD-Rom recorder drive.
12. The authoring software: you can use your favorite authoring software or try Musicmatch, Windows media player, Audio editor / sound recorder.
13. You can record your .MP3 music files on to a blank CD disc just like data files. Any CD MP3 player can play these .MP3 audio file for you.
14. The .wav files will be record as CD-DA music on the CD disc. Just select the audio CD writing and import the .wav files and arrange them according to the sequence required,
15. Put in your blank CDR disc and write to the disc using disc-at-once mode and finalized as a CD-DA format. Exact procedure of writing would be dependent on the software you use. then start the coping to your audio CDR disc. You may want to use a CD-RW CD disc as a tester, them play it back on your PC.
Mp3 to Music CD: You can use software to convert your .wavs to to MP3s or MP3s to CD-DA music CDs as it's records to CDR.
If you want to hear your MP3s on your car CD play and don't have $1000. dollars for new car MP3 player, you can convert your MP3s to CD-DA music CD. these music CDR should play on most newer CD players.
There's a lot of software that can convert your music but, the one I like to use is MusicMatch Jukebox Plus click here. MusicMatch can covert your Mp3s as it burn a music CD that you can play on any CD player.
Update: The prices on Car Stereo MP3-CD receivers have drop to about $400 to 700. more here!
Programs to Convert & Burn CDs: click here!
CD to MP3 Rippers software: click here!
Note: When your encoder rips a music CD or .WAV file to a compressed audio format (.MP3 file), it compresses it while retaining the same clarity and range as that found on CD. But, some of the information gets lost, theoretically it's information that you aren't capable of hearing anyway. Or can you?
Note: Ultimately, the quality of your end result will depend on several things such as the initial sonic quality of the cassette, the quality of the audio card used, the power and flexibility of the computer, audio recording software and noise reduction software, your editing skills, etc. Copy & Burn a Cassette or LP To CDR Disc Tip Page. Remember to come back to WebTechGeek.com for more How To's tips!
Speaker Tip
Software:
Media Box MP3 Workstation - Audio grabber, easy mp3 encoder, mp3 dj mixer player, database organizer, ID3 batch editor and more.
Audio editor / sound recorder: Edit mp3 and wav formats. Use the sound recorder to create wav files from tapes, vinyl, microphone, mixing deck etc.
Converting Vinyl to Digital: The Preamp Connection
Home | Audio | DIY | Guitar | iPods | Music | Links | Site Map | Contact
![]()